How To Clean Old Aquarium Gravel? ( Without Harming Good Bacteria)

One of the finer nuances of keeping an aquarium successfully is getting to know about the beneficial bacteria that colonize the various parts of the aquarium including the gravel. These bacteria are vital to the well-being of the aquarium and one of the critical aspects of aquarium maintenance is to ensure that no harm comes to these bacteria.
However, aesthetics play a big role in the pleasure that can be derived from an aquarium, and making your aquarium look spotless is often one of the driving factors behind the maintenance work carried out on an aquarium. Aquarium gravel plays an important role in the aquarium but its position at the very bottom of the aquarium makes it the place where all the grime and detritus accumulates. It can also develop a coating of algae and all of these combined can make the gravel look quite ugly. It can spoil the entire look of your fish tank and as such, it can be quite tempting to take out the old gravel and clean it nicely to make it look like new and then put it back in again. However, doing this has to be done with care.
Why Gravel Is Important To The Aquarium?
Aquarium gravel can be considered as the base around which the ecosystem inside your aquarium is built. It is one of the most stable parts of the aquarium and one of the main locations where a lot of the hidden processes such as the nitrogen cycle take place. It is also the norm to find the largest colony of beneficial bacteria in the gravel. The older and more mature the gravel, the most established the colony of bacteria will be. This in turn will make the aquarium quite stable and a safe haven even for delicate fish.
So, as you can imagine, any disturbance in this “base” can have drastic and long-reaching effects throughout the aquarium. So, the last thing you want to do is simply take all the gravel out and wash it thoroughly until all the visual imperfections are gone, and then put it back in the aquarium. Instead, you have to take a more measured and planned approach to clean old gravel.
The Safest And Easiest Option
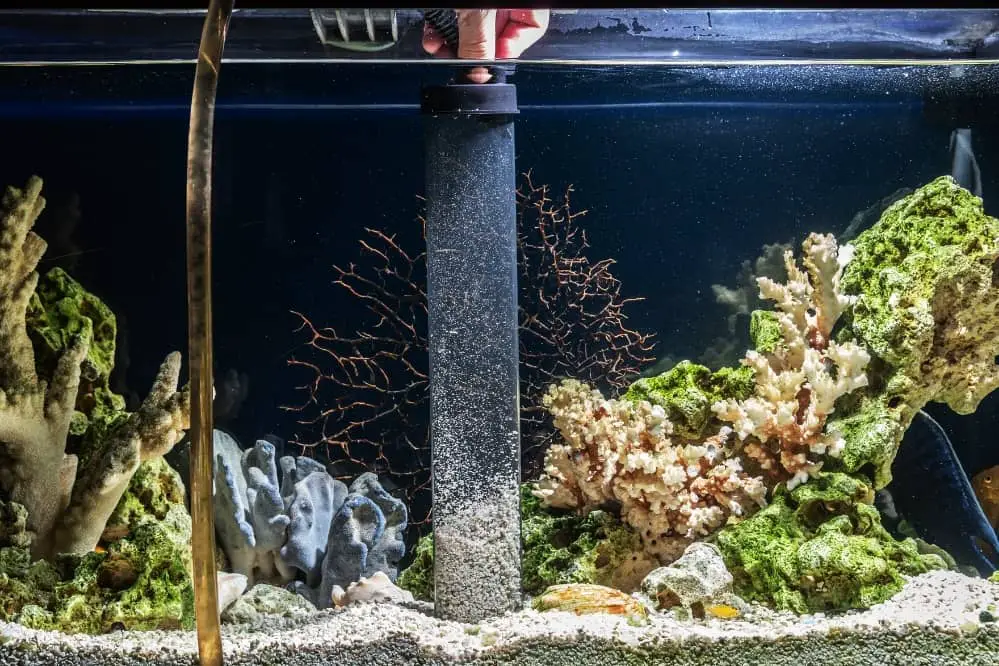
While taking all the gravel out and washing it would seem like the most obvious way of cleaning the gravel, it is also the most disruptive and potentially risky method. If the gravel is visually all right and all you want is to remove all the detritus and grime that has collected in the gravel bed then a gravel vacuum is the best way forward. These are handy little manual pumps that you probably already own. They are readily available at almost every pet shop and they are easy to use as well.
Get the water flowing from the aquarium into a bucket using the gravel vacuum. Then run the vacuum over the gravel ensuring that the end of the vacuum is gently pushed into the gravel. The resulting suction force will pull out most of the debris stuck between the gravel. Repeat this until the water draining out is clear. Doing this regularly every time you change the water is a good way of avoiding the build-up of detritus.
The advantage of this method is that it is a lot less time-consuming and labor-intensive. It is also much less disruptive on your aquarium both with regards to the fish as well as the colony of beneficial bacteria. The main drawback will be that no matter how thorough you are, there will always be some unwanted material trapped in between the gravel. It also won’t remove any coating that may have formed over the gravel.
This method is usually enough as far as ensuring the good health of your aquarium is concerned. However, once your aquarium attains a certain age, the gravel will take on a very unpleasant look. It can also become so compressed that dangerous gas pockets can form beneath the upper layer of gravel. This can then get released if there is a disturbance and this can have a catastrophic effect on your fish.
So, after about every five years you will need to give the gravel a thorough cleaning. This can be sooner if the gravel is light in color. When you have reached this point, it is time to do some serious cleaning.
The Difficult Way
As you might have guessed, this will involve taking all the gravel out of the aquarium, thoroughly washing it, and then putting it back in. To do this, you will need a few things listed below
- A large container or a spare aquarium large enough to house all your fish. You should also be able to attach your aquarium’s filter to this as the fish will be in there for a few hours
- As many containers as you can to store as much of the aquarium water as possible
- Something to store the gravel in. It should be something that will make it easy to clean as well. A bin with perforations is a great option
- Something to scoop the gravel out
- A pump to make it easier to drain the water out
- Plenty of clean rags or pieces of cloth preferably lint-free and microfiber
- Plenty of time
- If possible, also make sure to have someone with you as this is a pretty laborious job.
Once you have made all the necessary preparations, it is time to begin. The main objective of this exercise apart from cleaning the old gravel is to ensure that there is minimal disruption in the ecosystem already established inside the aquarium.
This means, saving as much of the old bacterial biomass as possible. Since they will more or less end up being eliminated from the gravel, it is very important to make sure that the other places they might have colonized are preserved.
First on this list is the water itself. A lot of the beneficial bacteria can be found freely swimming in the water column. So, make sure to save as much of the water in the aquarium as possible. It is for the same reason you should schedule the gravel cleaning at least 10 days after the last water change. Add as much water as you can to the temporary holding place for your fish and then save the remaining water in other containers. Try to ensure that a minimum amount of the existing mature water in the aquarium is wasted.
Also make sure that the filter media is mature and is at least a few months old. Do not change the media for at least two months after cleaning the gravel.
Somewhere at the halfway point of draining the water, transfer the fish to their temporary home. This will be a stressful situation for the fish regardless of how you do it but you can take a few precautions to minimize the stress. Cover the walls of the temporary holding tank with dark paper or cloth to make them feel safer. Also, use a good size net to ensure that the entire process of transferring the fish is done as quickly as possible.
Once this is complete ensure that the temporary enclosure has proper filtration, aeration, and a working heater. By keeping the water conditions consistent throughout this process you can give your fish the best chance of making it through this ordeal in one piece.
Drain as much water as you can and then start scooping out the gravel after other decorative items like pebbles, wood, etc have also been removed. This is an arduous process which at times might seem like an unending endeavor but keep at it and eventually, your fish tank will be empty. Use the rags to clean out the remaining water and anything else that might be stuck to the insides of the aquarium. Do not use any sort of chemical to do this and the rag you use should not leave scratches.
It is finally time to clean the gravel. Before you begin though, make sure to take about 5-10 percent of the dirty gravel and set it aside. This will act as the seed gravel for later from which the colony of beneficial bacteria can once again propagate from.
For the actual cleaning, it is ideal to do this somewhere with a lot of space where you can rinse the gravel with a hose. Keep rinsing the gravel and agitating it till the water passing through the gravel comes out clear. This can take some time but keep at it. You might be tempted to use some form of a cleaning agent but refrain from doing this unless you want to kill all your fish.
Once the gravel is clean rinse it a couple of times more with de-chlorinated water to remove any traces of chlorine that might have been present in the tap water. Mix the unwashed gravel that you had set aside earlier with the clean gravel and put it all back in the aquarium. Add the water you had saved up from before. Let it sit for about half an hour. Add the filtration system, aeration system if any, and the heater. Then transfer the fish as carefully as possible. Do not add any fresh water yet. Wait for a day and keep a close watch over the aquarium. Keep testing the water parameters especially for ammonia and nitrites. They will initially be present but should eventually come back under control. Once the water parameters are back to normal and no ammonia or nitrite is detected, top up the aquarium with fresh water and you are done.
Final Thoughts
This is a risky process and you might likely end up losing a fish or two. This should be used as a last resort on an old aquarium. However, with proper maintenance and regular upkeep, you may never need to do this. Another trick you can employ is to use dark-colored gravel as it won’t take on a dirty appearance. Finally, keep in mind that if something doesn’t look pleasing inside the aquarium it doesn’t mean that it is unhealthy. Keeping the aquarium as stable as possible is the best way to ensure the well-being of the fragile ecosystem inside the fish tank.


0 Comments